Ripla
Rich Platform project for Java web applications.
This project is maintained by aktion-hip
What is Ripla?
Ripla is a platform for rich web applications. Using Ripla as basis, you can easily create or compose full featured web 2.0 applications. Thus, Ripla is in the web realm what Eclipse RCP is in the realm of installable rich client applications.
Ripla is based on OSGi for the the modularization aspect and Vaadin 7 for the user interface.
Ripla core feature
From a user perspective, an application is a set of use cases where different users at different moments interact with the system and with other users to achieve a certain goal. The Ripla platform builds on this understanding.
In the Ripla programming model, software developers implement use cases and plug them into the Ripla platform, thus composing the web application part by part. Each use case is implemented as an independent OSGi bundle, i.e. a software component containing both the business logic and the resources needed to render the visual aspects of the use case in the browser window.
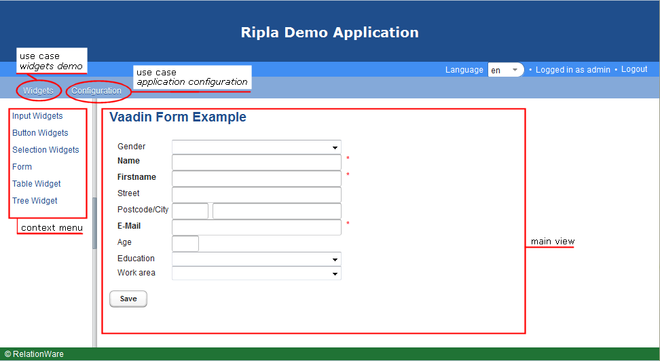
The visible representation of a use case in the browser window is an entry in the menu bar with a possibly complex pull down menu attached. If the user clicks an entry in the use case’s pull down menu, the associated view is displayed in the browser’s main window. Each use case view can be accompanied by a context menu which is displayed in the context menu area. Therefore, a use case bundle for a Ripla application has to provide the menu set for the main menu, the views for the main window, the context menus and, of course, the controllers containing the logic to control the views.
By itself, Ripla can't do anything. The only thing Ripla can do is managing the use cases plugged in.
Creating a Ripla application (in 5 steps)
To create a Ripla application, you have to do the following steps:
- Create an application bundle containing the application's main class which has to extend org.ripla.web.RiplaApplication.
- Create at least one use case bundle containing a use case service implementation (i.e. a class implementing the org.ripla.web.services.IUseCase interface) as well as the use case's resources, i.e. views and controllers.
- Create a bundle fragment containing the layout resources, i.e. style sheets and images for the layout you want to use for your application.
- Create a skin bundle for your application, i.e. a component containing the service provider for org.ripla.web.services.ISkin and referencing the skin bundle fragment.
- Collect other OSGi bundles you need for the application's business or persistence layer (e.g. service providers for the org.osgi.service.jdbc.DataSourceFactory service).
That's all!